Creating Out-of-Office Automatic Replies On Microsoft Outlook Sometimes, being out of the office is difficult to communicate to others without having to hop online and reply to their emails. After all, you don't want anyone thinking you're...
This story originally appeared on Calendar

Sometimes, being out of the office is difficult to communicate to others without having to hop online and reply to their emails. After all, you don't want anyone thinking you're ignoring them, or that you aren't receiving their messages. Maybe you're taking a vacation, are out sick, or tending to another situation. Whatever the case may be, communication is essential, even when you're trying to unplug.
That is why Microsoft Outlook has an out-of-office automatic replies feature. This feature allows you to customize a message that is automatically sent when someone emails you during your out-of-office time. Not only can you instantly let people know you're away from your email, but you can also let them know how to proceed. This could include simply waiting for you to get back, or maybe your message has instructions on who to contact in your stead.
In this article, we will be guiding users on how they can implement these out-of-office Automatic Replies on Outlook; Both for the web version as well as the desktop app version. Both versions contain many similarities – but also a few key distinctions – that are important to discuss.
Out-of-Office Automatic Replies Using the Web Version
First, we will start with setting up your Automatic Replies using the web version. Once you login to your Microsoft 365 account, you will select the Settings button, which looks like a small gear wheel. From there, you will find a settings search bar where you will input "automatic replies" into the search bar. Just like when you use a search engine, you'll see automatic suggestions start to show up below as you're typing.
In the example below, you can see where to find the Settings tab, as well as how to search for the Automatic Replies setting.
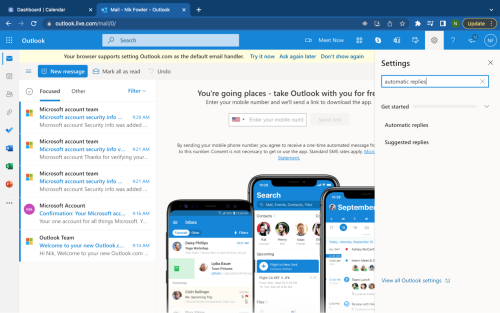
Settings Screen
Viewing Automatic Reply Settings
After you've found Automatic Replies below in the dropdown, select it. This will take you to the page in which you can write the message you want users to see when they email you. Here, you'll also be able to customize the rules for the message.
Once you've selected Automatic Replies, the image below is the page you should now be seeing.
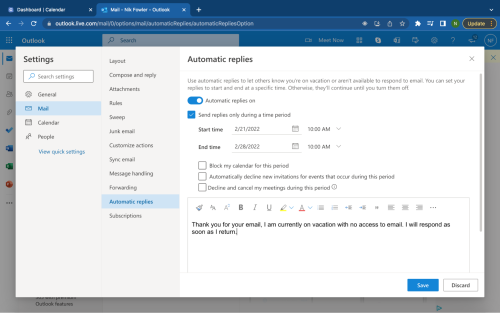
Automatic Replies Settings
Customizing Your Automatic Reply
In the above image, you can see all of your customization options as well as the Automatic Replies button. Now that you've reached the Automatic Replies page, you'll then be able to customize your message – in addition to all sorts of other rules. But first, you will need to toggle on the Automatic Replies button. Once you've done that, you'll be able to customize your automatic reply date range, as we will discuss below.
Customizing Date Range
When you want your reply message to send – most likely while you're taking a vacation – you'll select the date range in which you want them to send automatically. This way, it won't matter if you forget to turn them off when you get back to work, since they are automatically turned off on the date you've chosen.
Customizing Other Exclusive Features
The three calendar-related options you will see are exclusive features to the web version. Essentially, you're getting some additional functionality in comparison to the desktop app. These calendar features offer the ability for you to block your calendar's visibility for a period of time, which means it will display you as unavailable in your calendar. To achieve this, check the box to the left of the option that gives you the option to block access to your calendar during that time.
In addition to blocking your visibility, you can also customize your calendar to automatically decline any new invitations during the period you've selected. You can achieve this by checking the box to the left of the option that allows you to decline invites that take place during this time. This guarantees the reassurance, in the case that you're invited to any new events that occur during this time, that people immediately know you're unavailable. So, you won't have to worry about accidentally leaving someone wondering about whether or not you can attend.
The last calendar option you'll see is the one that lets you decline and remove events during this time. This is more of an emergency feature like you are sick for a few days but have things on your calendar you are supposed to be on. By selecting the box to the left of this option, all of the events you are a part of will be declined or canceled. This will save you the time of having to individually access each event and update them manually.
Customizing Automatic Reply Message
Lastly, and most importantly, you'll type the message itself. The message in the screenshot below is an example of a simple, common reply. However, they can be much more detailed, depending on your particular situation. Once this last step is completed, you'll be ready to save the message and stay worry-free about your inbox while you're out!
The image below is an example of what the Automatic Reply message looks like in action.
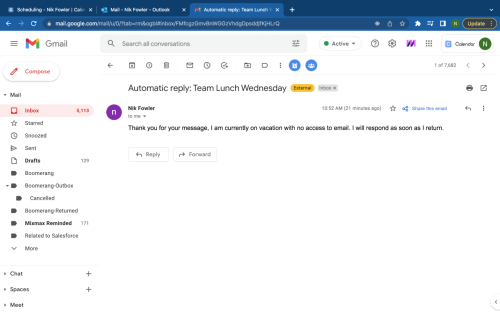
Automatic Reply Message
Out-of-Office Automatic Replies Using the Desktop App Version
Next, we will discuss the method in which users can create out-of-office Automatic Replies using the desktop app version. The process is very similar to that of the web version – with just a few minor differences. First, you will access the app and select the File button in the upper right-hand corner, as shown in the image below.
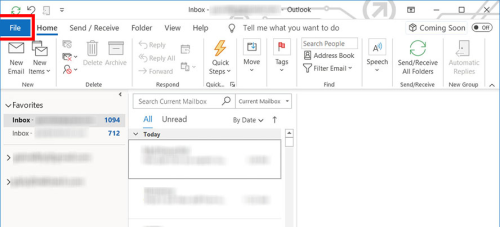
File Location
Customizing Automatic Reply Settings
Once you have clicked the File button, the app will take you to your Account Information screen. From there, you will see the option labeled Automatic Replies. By clicking on it, you will then be directed to the page where you can create your message and set your rules; very similar to the web version.
The image below shows where the Automatic Replies button is located after you've clicked File.
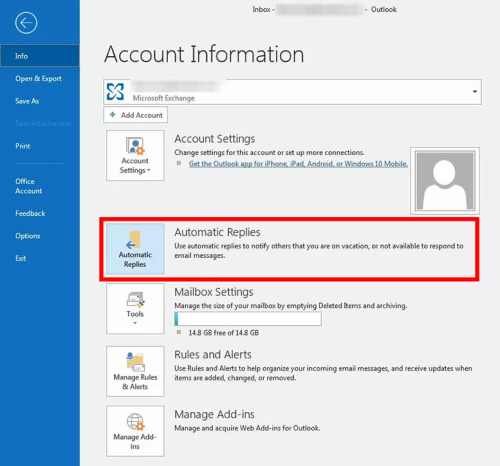
Automatic Replies Option
Creating Your Automatic Reply
After you've accessed the Automatic Replies tab, click on the circle to the left of the "Send automatic replies" option. Next, proceed with customizing your rules and creating your automatic reply message. As you can see in the screenshot below, the desktop app version does not offer as many calendar privacy options as the web version does.
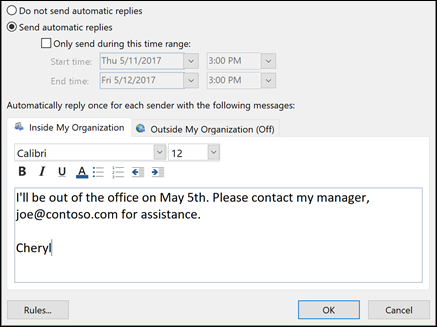
Creating Automatic Reply
Despite this version having fewer customization options in comparison to the web version, it does allow you to filter the message based on whether or not the person who emails you is in your organization. Not only is this extremely helpful, but it is also much more secure.
For example, your automatic replies to people who are external to your organization might be very brief, and may contain limited details. On the contrary, the automatic reply to your coworkers could have much more detail, in addition to specific instructions on who to contact while you are away.
Concluding Thoughts
In summary, Microsoft's Automatic Replies feature is a great tool in that it allows you to take a vacation – or a couple of sick days – in peace. Knowing that everyone who reaches out to you will automatically receive your customized out-of-office message will put your mind at ease. With this guide, you'll have all the resources you need in order to set up your next automatic reply message so you can truly unplug without leaving any loose ends.
Featured Image Credit: Anastasia Shuraeva; Pexels; Thanks!
Images 1 – 3: Nik Fowler-Hainen; Thanks!
Image 4: Microsoft Support; Thanks!
Image 5 & 6: HelloTech; Thanks!
The post Creating Out-of-Office Automatic Replies On Microsoft Outlook appeared first on Calendar.


