How to Disable Web Notifications Wishing you could receive fewer notifications from your browser? There are ways to control push notifications and block the pop-ups you don't want.
This story originally appeared on PCMag

Interruptions on the internet take many forms, from pop-up windows and browser notifications to video ads and page overlays. Pop-ups are largely seen as a nuisance — they sit atop the web page you're reading, with an ad, video, or message — but notifications have their benefits (in moderation).
Notifications appear in the browser, dropping down from the URL bar to ask whether or not a website can use your location or send you notifications. Autoplay videos are usually sent from specific websites and interrupt your browsing experience. Push notifications are sent from specific services — like Slack, Twitter or Facebook — and temporarily display over whatever window you have open.
Luckily, major browser makers have tools to make certain alerts less invasive. Here's what you need to know to keep these notifications and pop-ups in check.
Related: How Can Entrepreneurs Use Technology To Become More Productive?
Chrome
Navigate to Settings in Chrome via the three-dot menu, then select Settings > Advanced > Privacy and security > Site Settings > Notifications. Here, Google recommends you keep Ask Before Sending enabled, but that means every time a website wishes to send you a notification, you will get a pop-up message asking for your approval. Instead, click the slider on the right and it will read Blocked, which will eliminate all notifications.

But receiving absolutely no notifications may not be the best solution for you. In this case, Chrome allows you to block and whitelist individual websites.
If there are specific sites with annoying notifications you want to stop, add them to a block list, or keep everything blocked and only allow a few websites to send messages. Do this by clicking the Add button under the Block or Allow sections and add the URL in question. If you change your mind about a website, click the three-dot menu and remove it from the list.
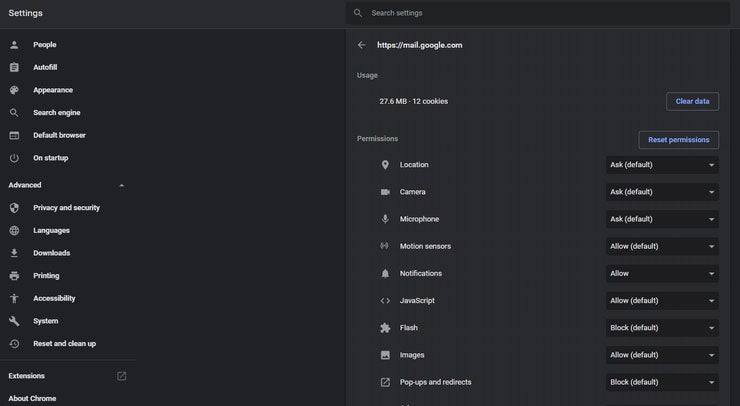
Chrome also allows you to dig down even further into any website on your Block or Allow list. Click on the drop-down arrow next to an item on the list and you can control permissions for that site.

This includes permissions for location, camera, and microphone, requests, pop-ups and redirects, and intrusive ads. By default, most items are set to Ask, but you can go through and set exactly how each website will act.
If you're looking for greater control over all these elements, backtrack to Settings > Advanced > Privacy and security > Site Settings and you can control permissions for all websites. While Chrome does a lot of the work for you by blocking intrusive ads and pop-ups by default, there are still cookies, location data, peripherals, downloads, and more to control.
If this all feels too complicated, you can skip it and browse in Incognito Mode, which blocks notifications by default.
Firefox
Starting in with Firefox 72, expected next year, Firefox will require user interaction on all notification permission prompts, meaning "before a site can ask for notification permission, the user will have to perform a tap, click, or press a key."
Until then, navigate to the upper-right of Firefox, select the hamburger icon > Options > Privacy & Security then scroll down to the Permissions section. Here you can grant websites permission to access location data and the computer's peripherals, as well as send notifications and autoplay videos.

Right away you can click the checkbox under notifications to pause all notifications until Firefox is restarted, giving you some time to be free of invasive messages. Firefox also blocks pop-ups and warns of unauthorized add-ons by default. If you want to authorize individual websites in any of these categories, select the Settings or Exceptions button.

A menu will display a list of websites you have previously blocked or allowed directly from notification prompts. Check the box at the bottom of the menu to block all new notification requests going forward. If there are items on the list that you wish to change, use the drop-down menu to switch between Blocked and Allowed, or you can remove them from the list entirely.
Related: 3 Rules I Use to Stay Productive and Not Overwhelmed
Safari
In Safari, navigate from the macOS top menu and select Safari > Preferences > Websites > Notifications to view all the websites you have either allowed or denied notification permissions. Use the drop-down menu for each entry to change permissions, or highlight a website and click Remove to delete it altogether.

You can also uncheck the box next to Allow websites to ask for permission if you want to stop pop-up notifications completely.
You can also manage notifications at the operating system level. Go to System Preferences > Notifications > Safari and you can determine how the web browser relays notifications to you, or whether it will at all. Set the alert style to None and uncheck the boxes for the notification settings you wish to disable.

It should be noted that this method will also work with Chrome, Firefox, and any other third-party browser you use on Mac.


